How To Assemble Your Mini Keg With Spearhead, C02 Dispenser and Tap
For 5L and 10L mini kegs
Key to the components
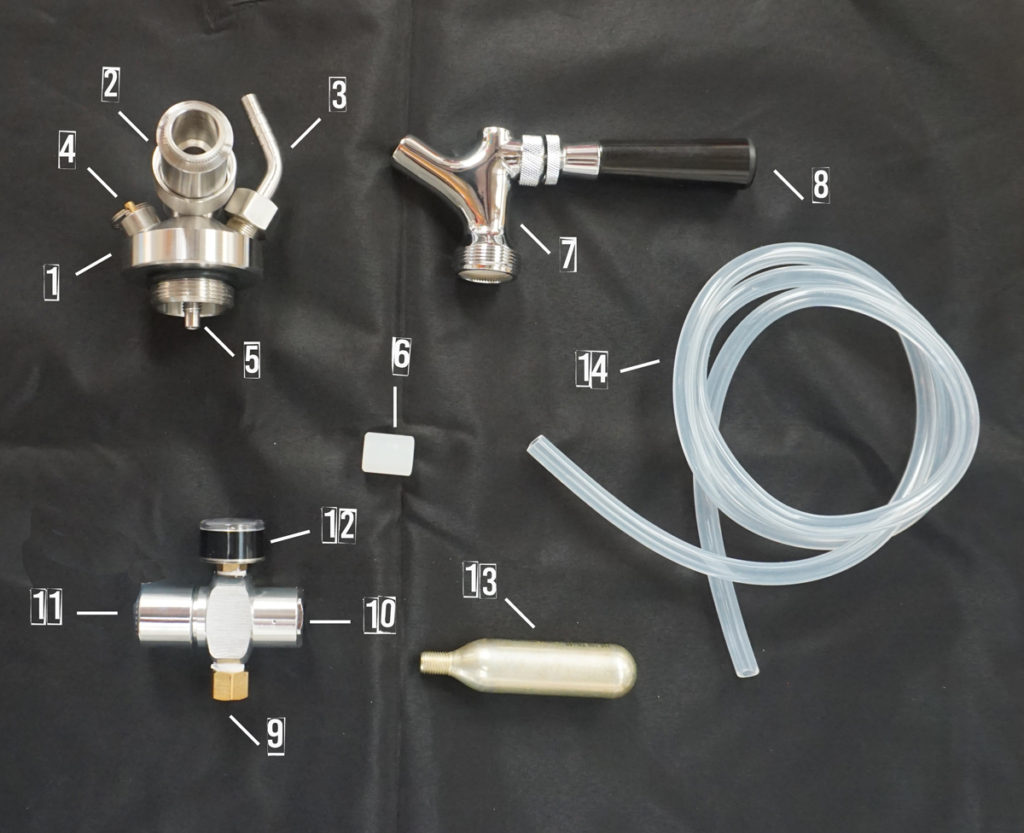
1 = Spear body
2 = Cross-bar
3 = Twist tube
4 = Pressure relief ring
5 = Nut
6 = White flow-control block
7 = Tap
8 = Tap knob
9 = Regulator
10 = Regulator base
11 = Regulator knob
12 = Gauge
13 = 16g CO2 cartridge
14 = Beer hose
SPEAR ASSEMBLY
-
Wash the mini keg, cap, spear body, tap and beer hose in warm water and a mild soap before use.
-
Insert the white flow-control block (6) into the the cross-bar (2) – this limits the flow of the beer to prevent it from over-foaming.
-
Connect the tap (7) to the spear body (1). Make sure you screw it on tightly to prevent it from leaking.
-
Cut the beer hose (14) to match the height of the keg – the hose needs to be long enough to just touch the bottom of the keg. Important! Make sure you don’t cut the hose too short! If it doesn’t reach the bottom then your precious beer won’t be completely tapped. But don’t keep the hose too long either, or it may kink up inside the keg and you won’t get your beer out.
-
Insert the hose (14) into the spear body (1). Check that the regulator knob (11) is in the OFF position. If it’s not, turn the knob counter clockwise to OFF.
-
Screw in a new CO2 cartridge (13) (thread type 3/8” – 24 UNF) by turning clockwise into the regulator base (10). You’ll hear a slight hiss from the gas but don’t stop turning until the cartridge is properly screwed into the base, to ensure that it is properly sealed.
TAPPING
Remember to always sterilise your keg before filling with your precious brew!
-
After filling your keg, attach the spear system (see spear assembly above) on to the keg. Make sure it’s tightly screwed together to avoid it leaking.
-
Connect the regulator (9) to the spear system.
-
Pull the pressure relieving ring (4) for a couple of seconds to release any excess pressure, which is created if the keg is slightly warm or if it’s recently been transported. You’ll hear a hiss as the pressure is released.
-
Slowly turn the regulator knob (11) clockwise to 5 PSI. Wait for 2 seconds then turn off the regulator. Wait for 2 minutes then pull the pressure relief ring again for a couple of seconds to adjust the pressure.
-
Now pour your beer! Put a glass or a jug under the tap spout. With the tap knob pulled forward (ON), slowly turn the regulator knob (11) clockwise until the beer starts to flow. Important! Don’t add any more pressure as this will create too much foam. We recommend 5 ~ 8 PSI (max pressure 30 PSI). Stop turning the regulator knob when there’s enough pressure to tap the beer with the perfect amount of foam. If the beer stops flowing, or is flowing too slowly, try slowly turning the regulator knob to increase the pressure.
-
When you’ve finished tapping, turn the regulator knob (11) to the OFF position.
REPLACING THE CO2 CARTRIDGE
If you can’t get any beer out of the tap and you’re sure there is still beer in the keg (we always empty ours way too quickly – but who’s counting, eh?) you’ll probably need to change the CO2 cartridge. Normally, a 16g cartridge should last for 4-5L of beer.
-
Turn the regulator knob (11) off and unscrew the spent cartridge by turning anti-clockwise. You’ll hear a slight hiss from any remaining pressure.
-
Replace with a new cartridge, screwing it in a clockwise direction until it sits tight. Don’t stop turning if you hear a small hiss of gas – continue until it seals correctly.
Caution! Remove any punctured / damaged cartridge very slowly.
TROUBLE SHOOTING
Leaking tap (8)
Unscrew the tap (8) from the cross-bar (2) and then re-attach making sure that the tap properly threads onto cross-bar (2). Twist tightly to ensure it’s correctly sealed.
Leaking Spear Cross-bar (2)
Under the spear main body you’ll find a nut (5); tighten the nut with a wrench.
Too Much Foam
The white flow-control block (6) helps reduce the speed of the flow of beer, which reduces the foam. If you do have excess foam this can be caused by too much pressure; in this case pull on the pressure relief ring (4) for a couple of seconds.
Note: for safety, when the pressure in the keg reaches 30PSI the pressure relief ring will automatically regulate the pressure by releasing excess CO2.
Leaking CO2
Ensure that the CO2 cartridge is properly attached and tightly sealed.
Safety warning! Do not unscrew and remove the CO2 cartridge before it is completely empty.
SAFETY WARNING
-
Keep away from children under 18 years.
-
Never point the cylinder at someone’s face
-
Do not heat over 140F / 60c as the equipment could rupture
-
Discontinue use if any visible damage is found on the equipment or if you cannot resolve any leakage problems.
-
When the cartridge (13) is inserted into the regulator base (10) the end will be punctured to access the gas inside – unscrewing the CO2 cartridge before it is empty can result in high pressure gas. Never unscrew the CO2 cartridge before it is completely empty as liquid CO2 spray may cause freeze burns when in contact with unprotected skin.
-
The exterior of the CO2 cartridge may become frozen when in use. This is perfectly normal but please do not touch it with your bare hands – your fingers could stick to the frozen surface, which could result in frostbite.
-
Never take your CO2 cartridges onboard a plane.